One question I am often asked by students is how to set up nice lighting for a model. In most cases, the model is a character or a prop. (Environment models require a different way of lighting.) In this post, I will walk through the process of lighting a model. I am using 3ds Max with Mental Ray renderer in this tutorial.
To illustrate, I will use this head model.
 |
| Figure 1. Plain model |
I start by using a HDR image as the environment map.
A few words about HDR. HDR stands for "high dynamic range". Dynamic range means the possible range of brightness that an image has.
- Images that we are familiar with, such as JPG files, are said to have a standard or low dynamic range because they are limited to the range of black (brightness value 0.0) to white (brightness value 1.0).
- High dynamic range images (HDR images) have a range beyond 0.0 and 1.0. The brightest pixel, such as lights or the sun, can have a value like 120.48. Much larger than 1.0!
Practically, this means that a HDR image has a different format and is usually larger in size. Typical formats are .HDR and .EXR. For the case of the HDR image I will use below, it has the dimension of 4000x2000 and file size of 22.9 MB. The low dynamic range version, a JPG file, with the same dimension has a file size of 3.8 MB.
I recommend reading the Wikipedia article on HDR to learn more.
I used
the "Luxo Jr" HDRI map provided by Pixar (who kindly put it in public domain). Figure 2 shows how to create a
Bitmap map that uses a HDR image file:
- Create a Bitmap map using Material Editor. (Press "M" to open the Material Editor.)
- Make sure to override the image gamma to 1.0.
- Click "Setup" button.
- Make sure "Enable Color Correction" is disabled.
- Set Mapping to "Spherical Environment".
- Set U Tiling to -1.0 to flip the image horizontally.
 |
| Figure 2. Preparing a Bitmap map to be used as the environment map |
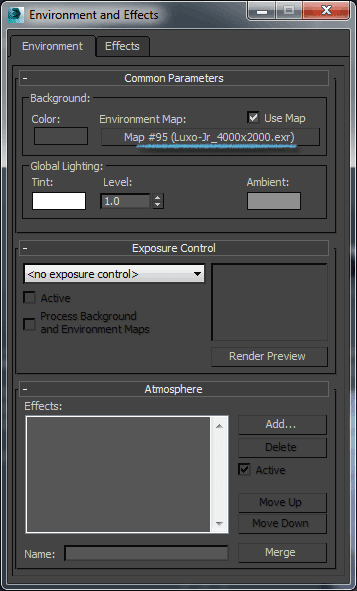
I then dragged and dropped "HDR map" into
Environment Map slot. (Press "8" to open the
Environment and Effects dialog.)
 |
| Figure 3. Setting the Bitmap to the Environment Map slot |
At this point, I get this render. As expected, the background is now an image.
 |
| Figure 4. Rendered image after setting the Environment Map |
In case your render is much darker, make sure you enable gamma correction.
 |
| Figure 5. Enabling Gamma Correction |
Next, I created a
Daylight system.
 |
| Figure 6. Creating a Daylight system |
Using a Daylight system means that we need to turn on
Exposure Control in
Environment and Effects
dialog. I will cover this below. Here are the settings for the Daylight system:
- Set Position to "Manual", then move the Daylight to the appropriate position. I used the background image to guide the placement.
- Set Sunlight to "mr Sun" and Skylight to "mr Sky". ("mr" stands for Mental Ray; though I find myself reading them as "mister Sun" and "mister Sky".)
- Set Red/Blue Tint of mr Sun to 0.1.
- This makes the sun color a little yellow.
 |
| Figure 7. Daylight system and its settings |
And here are the settings for
Exposure Control in
Environment and Effects dialog.
- Drag and drop "HDR map" from Material Editor to Environment Map slot.
- Set Exposure Control to "mr Photographic Exposure Control".
- Set Exposure Value (EV) to 14.125.
- This will make rendered image not overly bright.
- If I set the Exposure Value to 0, the rendered image will by almost totally white because the strong mr Sun overexposes the image.
 |
| Figure 8. Setting Exposure Control |
Some of the settings above are my attempt to match the lighting in the background image. Matching lighting in this case involves 3 steps:
- Placing the Daylight approximately where the sun is in the background image;
- Setting the Exposure Value such that the brightness of the Daylight is similar to the background image;
- Setting the Red/Blue Tint parameter of mr Sun to match how yellow the sunlight is in the background image.
Finally, I turned on Final Gather (FG).
- Check Enable Final Gather.
- Set the three parameters (Initial FG Point Density, Rays per FG Point, and Interpolate Over Num. FG Points) as shown below.
 |
| Figure 9. Enabling Final Gather |
After all these setups, we are done with our lighting setup. Here is my final render.
 |
| Figure 10. Rendered image with the HDR lighting |
Bonus: Image-Based Lighting (IBL)
An alternative method is Image-Based Lighting (IBL). IBL is faster to set up (you do not need to match the lighting in the background image), but slower to render.
The first two steps are identical to the previous method:
- Create a Bitmap map that uses a HDR image.
- Drag and drop the Bitmap map to the Environment Map slot in "Environment and Effects" dialog.
Next, we create a
Skylight. Make sure to select "Use Scene Environment".
 |
| Figure 11. Creating a Skylight |
We then enable IBL in the "Global Illumination" tab.
 |
| Figure 12. Enabling Image-Based Lighting (IBL) |
|
Here is the render that I get.
 |
| Figure 13. Rendered image using IBL |


No comments:
Post a Comment