Showing posts with label Tutorial. Show all posts

Thursday, September 17, 2015

Rendering Maya nHair Using Mental Ray

In the previous post, we saw how we can create an nHair system in Maya using FiberMesh in ZBrush. In this post, we will see how we can render the nHair system in Maya using Mental Ray and get as render like this.
nHair system rendered using Mental Ray.

Before we start, make sure that Mental Ray is loaded and that it is the active renderer. Here is my render at this point.
Figure 1. Render at the starting point.

1. Creating Physical Sun and Sky

We are going to light the scene using Mental Ray's Physical Sun and Sky system. (In 3ds Max, the equivalent is the Daylight System.) Creating physical sun and sky is easy:
  1. Open the "Render Settings" dialog.
  2. Go to "Indirect Lighting" tab (see Figure 2).
  3. Expand the "Environment" group.
  4. Click the "Create" button next to "Physical Sun and Sky".
Figure 2. Creating Physical Sun and Sky.
Here are what happened when we pressed the "Create" button:
  • Final Gather is automatically enabled (see Figure 3 left).
  • A directional light called "sunDirection" is created (see Figure 3 right).
Figure 3. Left: Final Gather is enabled. Right: a directional light is created.
There are more things happening behind the scene that we need to understand.
  • Let us start by selecting the "sunDirection" light.
    • The Attribute Editor shows the parameters of "sunShape" (see Figure 4 left).
    • Notice that "sunDirection" light is assigned a mia_physicalsun shader (see Figure 4 left). This is a Mental Ray light shader. It makes the directional light to behave physically correct during rendering.
  • Next, click the boxed arrow button on the right of "Light Shader" (see Figure 4 left).
    • The Attribute Editor now shows the mia_physicalsun parameters (see Figure 4 middle).
    • Notice that there are 5 parameters ("Multiplier", "Haze", "Red-Blue Shift", "Saturation", and "Horizon Height") highlighted in yellow. They are connected to the parameters of the physical sky shader (which we will inspect next). Remember that you can break any of these connections so that the sun shader uses a different parameter from the sky shader.
  • Click the "mia_physicalsky1" tab of the Attribute Editor (see Figure 4 right).
    • Notice that this shader uses the "sunDirection" light as its "Sun" parameter. This means you can create a light and assign it as the "Sun" of this sky shader.
    • Also, experiment setting the value of "Multiplier" to 2.0, then seeing the "mia_physicalsun2" tab. Confirm that "mia_physicalsun2" "Multiplier" value is also 2.0. The same connection applies to 4 other parameters as discussed above.
    • Make sure you set the "Multiplier" value back to 1.0 before proceeding.
Figure 4. More things happening behind the scenes. Middle: Mental Ray physical sun shader. Right: Mental Ray physical sky shader.
But that's not all. Select your render camera and see the Attribute Editor:
  • The physical sky shader, "mia_physicalsky1", is attached as "Environment Shader" (see Figure 5 left).
  • Another Mental Ray shader called "mia_exposure_simple1" is attached as "Lens Shader" (see Figure 5 left).


Figure 5. Mental Ray shaders attached to the camera. Left: the camera shape node. Right: the mia_exposure_simple shader.

We are particularly interested in the lens shader mia_exposure_simple:
  1. Click the boxed arrow icon on the right of "Lens Shader". The Attribute Editor will show the parameters for the mia_exposure_simple shader (see Figure 5 right).
  2. Notice that the "Gamma" value is 2.2.
  3. Render your scene.
    • My render looks like this.
Figure 6. Rendered image with Gamma value 2.2.
The rendered image looks deceptively alright, but it is actually overly bright because of incorrect gamma value.
  1. Set the "Gamma" value to 1.0.
  2. Render your scene again.
    • My render now looks like this.
Figure 7. Rendered image with Gamma value 1.0.

The shadow area looks more natural. However, the hair looks grainy and hard. We will now fix this.

2. Improving Sampling Quality

First, we will improve Mental Ray's sampling quality:
  1. Open "Render Settings" dialog.
  2. Go to "Quality" tab (see Figure 8).
  3. Expand "Sampling" section.
    • By default, the "Sampling Mode" is "Unified Sampling" and the "Quality" is set to 0.25 (see Figure 8 left).
  4. Set "Quality" value to 1.0.
  5. Render your scene.
    • The hair should look less grainy now, at the cost of longer render time.
Figure 8. Mental Ray Sampling parameters. Left: default settings. Right: my personal preference.
I personally find "Unified Sampling" mode make render time much longer than necessary; so I prefer to use "Legacy Sampling Mode" (see Figure 8 right). This mode gives me more control over the quality-render time trade-off. For example:
  • I set "Min Sample Level" to -1 & "Max Sample Level" to 1 for fast renders.
  • I set "Min Sample Level" to 2 & "Max Sample Level" to 3 for high quality renders.
I use the settings shown on Figure 8 right and here is my render.
Figure 9. Rendered image with improved sampling quality.
The hair still has grainy look to it, caused by hair shadow. We will fix this next.

3. Improving Hair Shadow

Select the light "sunDirection" and open the Attribute Editor:
  1. Expand the "Shadow" section (see Figure 10 left).
    • By default, the light uses ray traced shadows. The render scenes with hair, use depth map shadows instead.
  2. Check "Use Depth Map Shadows" (see Figure 10 right).
  3. Set the following parameters:
    • "Resolution": 4096;
    • "Use Mid Dist": unchecked;
    • "Filter Size": 4 (or higher; the higher, the more blurred the shadows are);
    • "Bias": 0.05.
Figure 10. Shadow settings.

Credit: I learned about hair shadow settings from the article "Set up hair self-shadowing" at Autodesk Knowledge Network. Read this article for more insight behind the values I set above.

Render your scene. My render looks like this.
Figure 11. Rendered image with improved hair shadows.
And that is it! You can now work on your lighting and get a nice hair render.

Friday, May 22, 2015

Setting Up HDR Lighting using 3ds Max and Mental Ray

One question I am often asked by students is how to set up nice lighting for a model. In most cases, the model is a character or a prop. (Environment models require a different way of lighting.) In this post, I will walk through the process of lighting a model. I am using 3ds Max with Mental Ray renderer in this tutorial.

To illustrate, I will use this head model.
Figure 1. Plain model
I start by using a HDR image as the environment map.
A few words about HDR. HDR stands for "high dynamic range". Dynamic range means the possible range of brightness that an image has.
  • Images that we are familiar with, such as JPG files, are said to have a standard or low dynamic range because they are limited to the range of black (brightness value 0.0) to white (brightness value 1.0).
  • High dynamic range images (HDR images) have a range beyond 0.0 and 1.0. The brightest pixel, such as lights or the sun, can have a value like 120.48. Much larger than 1.0!
Practically, this means that a HDR image has a different format and is usually larger in size. Typical formats are .HDR and .EXR. For the case of the HDR image I will use below, it has the dimension of 4000x2000 and file size of 22.9 MB. The low dynamic range version, a JPG file, with the same dimension has a file size of 3.8 MB.
I recommend reading the Wikipedia article on HDR to learn more.

I used the "Luxo Jr" HDRI map provided by Pixar (who kindly put it in public domain). Figure 2 shows how to create a Bitmap map that uses a HDR image file:
  1. Create a Bitmap map using Material Editor. (Press "M" to open the Material Editor.)
  2. Make sure to override the image gamma to 1.0.
  3. Click "Setup" button.
  4. Make sure "Enable Color Correction" is disabled.
  5. Set Mapping to "Spherical Environment".
  6. Set U Tiling to -1.0 to flip the image horizontally.
Figure 2. Preparing a Bitmap map to be used as the environment map
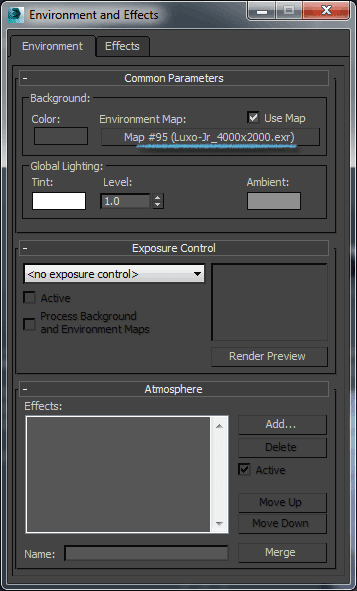
I then dragged and dropped "HDR map" into Environment Map slot. (Press "8" to open the Environment and Effects dialog.)
Figure 3. Setting the Bitmap to the Environment Map slot
 At this point, I get this render. As expected, the background is now an image.
Figure 4. Rendered image after setting the Environment Map

In case your render is much darker, make sure you enable gamma correction.
Figure 5. Enabling Gamma Correction

Next, I created a Daylight system.
Figure 6. Creating a Daylight system

Using a Daylight system means that we need to turn on Exposure Control in Environment and Effects
dialog. I will cover this below. Here are the settings for the Daylight system:
  1. Set Position to "Manual", then move the Daylight to the appropriate position. I used the background image to guide the placement.
  2. Set Sunlight to "mr Sun" and Skylight to "mr Sky". ("mr" stands for Mental Ray; though I find myself reading them as "mister Sun" and "mister Sky".)
  3. Set Red/Blue Tint of mr Sun to 0.1.
    • This makes the sun color a little yellow.
Figure 7. Daylight system and its settings

And here are the settings for Exposure Control in Environment and Effects dialog.
  1. Drag and drop "HDR map" from Material Editor to Environment Map slot.
  2. Set Exposure Control to "mr Photographic Exposure Control".
  3. Set Exposure Value (EV) to 14.125.
    • This will make rendered image not overly bright.
    • If I set the Exposure Value to 0, the rendered image will by almost totally white because the strong mr Sun overexposes the image.
Figure 8. Setting Exposure Control

Some of the settings above are my attempt to match the lighting in the background image. Matching lighting in this case involves 3 steps:
  • Placing the Daylight approximately where the sun is in the background image;
  • Setting the Exposure Value such that the brightness of the Daylight is similar to the background image;
  • Setting the Red/Blue Tint parameter of mr Sun to match how yellow the sunlight is in the background image.

Finally, I turned on Final Gather (FG).
  1. Check Enable Final Gather.
  2. Set the three parameters (Initial FG Point Density, Rays per FG Point, and Interpolate Over Num. FG Points) as shown below.
Figure 9. Enabling Final Gather
 After all these setups, we are done with our lighting setup. Here is my final render.
Figure 10. Rendered image with the HDR lighting

Bonus: Image-Based Lighting (IBL)

An alternative method is Image-Based Lighting (IBL). IBL is faster to set up (you do not need to match the lighting in the background image), but slower to render.

The first two steps are identical to the previous method:
  1. Create a Bitmap map that uses a HDR image.
  2. Drag and drop the Bitmap map to the Environment Map slot in "Environment and Effects" dialog.
Next, we create a Skylight. Make sure to select "Use Scene Environment".
Figure 11. Creating a Skylight
 We then enable IBL in the "Global Illumination" tab.
Figure 12. Enabling Image-Based Lighting (IBL)
Here is the render that I get.
Figure 13. Rendered image using IBL

Sunday, May 17, 2015

Preparing a Job Application part 3 - How to Prepare within a Limited Time

As an instructor at CG Protege, I had a number of occasions helping students preparing a demo reel (as a part of their job applications) within a limited time period. In this article I will cover a planning method I used. Admittedly, the degree of success varies with how discipline a student; but I think this is to be expected.

There are 3 major steps in the planning.

The first step is to clarify your goal.

Your goal is to submit an application to a specific company, by a specific date. There are 3 components in this goal: the application, the company, and the deadline.
Therefore, your goal consists of:
  1. Writing a cover letter specifically for the company, explaining why you are the best fit for the job opening;
  2. Customizing your resume to what the company is asking for;
  3. Assembling a demo reel (+ portfolio) to show that you have the skills that the company needs; and
  4. Submitting these to the company before the deadline.
The dominant factor here is the limited preparation time before the deadline. If you have not organized your works, allow yourself four to six weeks preparation time. If you have organized your work, one week should be enough.

You may ask, "How can I allow myself six weeks before deadline? After all, job application deadline is set by the company." My answer is, "Consider an different point of view. Assign yourself six weeks to finish your reel and apply for jobs with deadline after your estimated finish date." I admit that this is easier to say than to do.

The second step is to plan steps to your goal.

First, you should have a list of works you want to include in your demo reel.

Resist any temptation to go into a specific work file and do fixes. You may we end up spending most of the available time on one work (or two) and practically neglect the rest. We want to avoid this.

Next, you list what improvements or fixes you would like to do on each work (while keep resisting the tendency to fix anything). At this stage you can be as detailed as you want, no restraint yet. Spend up to 15 minutes for each work.

Now that you have considered all the improvements you want to do within the time available, you will realize that you need to prioritize. This is the next step. Create a timeline from today until the deadline. Move items from your improvement list into the timeline based on priority. In this way, you will have a daily plan to cramp in the most important improvements.

Here is a sample template:

Things to look out for:
  • If you have not rendered your reel, how long does it take to render a frame? How many frames are there in your reel? This sets the latest date you can still improve your 3D work.
    • Make sure you have time for rendering as well as fixing render problems.
  • Where are you uploading your reel? If you upload your video to YouTube, your video will be available almost instantly after uploading finishes. If you upload your video to Vimeo, your video will be available only around an hour after uploading finishes.
    • Make sure you have enough time to make your reel available for viewing.
  • Remember to include writing your cover letter and resume in your plan.
    • Make sure you have enough time to write an excellent cover letter.
    • Make sure you have enough time to customize your resume to the job position.
  • How do you submit your application?
    • Make sure you have enough time to submit.
From experience, I realize I am rather fanatical about planning. You can create a loose plan if you prefer, but I recommend to at least list all improvements you want to do so you can prioritize.

The third step is to carry out your plan.

Make sure to review your progress periodically. If your deadline is days away, review at the end of each day. If your deadline is further, you can review once every two days or even weekly.

During such review, compare what you planned to achieve with what you actually achieved. Update your plan for the remaining time accordingly so that you can get as many improvements as time allows. The update can be re-prioritizing to do items, removing to do items, or, very rarely, adding new to do items. You may end up with less than what you planned in the beginning, but you will achieve something better than what you started with.

I hope this simple planning help you.

Let me close this post with my story behind these articles. To you, this is the last part of a three-part article. To me, this is the article I started with. As I wrote this article, I found myself having to explain the details of writing cover letter and resume, as well as demo reel and portfolio. I ended up with a very long blog post. I decided to break them into three. As I fleshed out my outline, the content shifted a little from my original plan. I felt especially the second article felt not as sincere as I intended.

As always, if you any thoughts you want to share, please comment below.

Sunday, May 10, 2015

Preparing a Job Application part 2 - Demo Reel

In the previous post, we saw that a job application usually consists of 3 components: cover letter, resume, and demo reel. We also saw how you can prepare your cover letter and resume quickly.

In this post, I will cover how you can prepare your demo reel (plus a portfolio). Unlike the previous post, however, I cannot offer a fast process to create a demo reel from scratch. You should spend most of your time working on your demo reel, long before applying for a job. This way, when it is time to apply for a job, you already have a number of works ready to assemble in your demo reel.

In this post I assume that you already created your works; the question is how to present them in the form of a demo reel. I also assume modeling reel for simplicity.

Demo reel preparation for 3D animation industry is a well-covered topic:
Still, I have a point or two to add in. The theme I am emphasizing is the same as the one in previous post: Make it easy for the recruiter to remember you.

Demo Reel


A demo reel is a short video, usually around 2 to 4 minutes.

Remember why a recruiter watches your demo reel: the recruiter wants to see what you can do. So, make sure that:
  1. your demo reel demonstrates your skills and
  2. the skills you are showing are relevant to the recruiter's interest.

Demonstrating Your Skills

In the video How to Prepare Your Showreel for the Industry David Kwok covered what kind of works you include in your demo reel to demonstrate your skills; so I will not repeat this point.

Let me emphasize this: make sure that the first 15 seconds make the recruiter interested. You can test this by showing your reel to a person you trust and ask for an honest opinion. If the opening of your reel is boring, then make sure you fix it.

In my experience with students, there are common scenarios:
  • Opening screen (where you put your name and contacts) shows for too long or fades off too slowly.
    • Fix: Show your opening screen for shorter than 2 seconds; fade it off quickly, perhaps half a second or shorter.
  • Turntables are too long.
    • Fix: Keep testing your reel timing; make sure it is just right.

Showing Skills Relevant to Recruiter's Interest

Make sure your demo reel is appropriate for the company you are applying to.
  • If you apply to Industrial Light & Magic (ILM), do not show models like Pororo or Doraemon. ILM aims for teenagers and adults; while Pororo and Doraemon are for children.
  • If you apply for Pixar, do not show models like rugged, battle-worn Batman. Pixar aims for family, so show works that appeal children and adults.
Almost all my students think that an artist has only one demo reel and this demo reel is what he/she sends for all job applications. This is only partly right.

You should have a personal demo reel that you put on your portfolio website. In addition, you should create a customized demo reel for each job applications. How do you customize a demo reel?

Suppose you are a 3D modeler. You have 2 models so far: Pororo and battle-worn Batman.
  • When applying for studios that produce family entertainment or pre-school series, your reel should show only your Pororo model.
  • When applying for studios that produce products for teenagers and adults, your reel should show only battle-worn Batman.

Be precise. Make it easy for the recruiter to remember you.

Portfolio


A portfolio is a collection of physical artworks. This means physical drawings and paintings. Your portfolio should show your skills that are relevant to the recruiter's interest.
  • Studios that produce family entertainment probably will ask for appealing designs and strong shapes.
  • Studios that target teenagers and adults will ask for human anatomy, animal anatomy, perspective, and surface texture quality.
In Singapore, not all companies ask for a portfolio. On the other hand, if you do have a good one, you will stand out among other applicants (this is true at least for Singapore companies).

Preparing Your Reel and Portfolio

So how exactly do you prepare you demo reel? I suggest this process:
  • Before applying for a job:
    • Keep creating new works.
      • You will want to be able to apply to as many different companies as possible, so make sure you create a variety of styles. Maximize your opportunity.
    • When you finish a work, present it the best you can.
      • You will keep reusing this presentation, so make sure it is excellent and not just good or acceptable.
    • Collect all your work presentation in a portfolio folder. (For safety, you may want burn this folder into a DVD once a year for backups.)
  • When applying for a job:
    • Read the job description. Identify what the company wants.
    • Go through your portfolio folder. Identify works that match what the company wants.
    • Assemble these relevant works as your customized demo reel for this job application.
      • If you have taken care to make your presentations excellent, assembling a demo reel will take less effort.
      • Otherwise, not all is lost. You just have to put in time and effort to make your reel polished. We will see how to do this in the next post.
This process requires discipline, unfortunately. There is no shortcut in demo reel preparation. The earlier you start, the better.

Hopefully this post convinces you that the best time to start preparing your demo reel is now. In the next post, I will cover a planning method to make sure your job application (cover letter + resume + demo reel + portfolio) will be done on time. As always, please let me know what you think by leaving a comment below.


(Edited on 11 May 2015: Elaborated on points, improved wordings, and rearranged points.)

Friday, May 1, 2015

Preparing a Job Application part 1 - Cover Letter and Resume

Right now I am helping modeling students at CG Protege to prepare their applications for Jedi Masters Program, so I will share my preparation process in a series of posts. There are usually 3 things needed in a job application: a cover letter, a resume, and a demo reel (plus a portfolio).

In this post, I will cover how you can write a cover letter and a resume in half a day.
(Edit: I am writing this article in the context of 3D computer graphics industry. My points may be irrelevant in other fields.)

Around half of my students are afraid of cover letter and resume. I will tell them that these two are the easiest to finish. Even if you do not have these, you can finish a draft for both in 2 hours. Here is how.

Cover Letter

What do you write in a cover letter? In the minimum, it must:
  • introduce you and what job you are applying, and
  • make a strong case why you are the one for the job.

Spend 10 minutes researching cover letters, then start writing your draft. While writing, you may feel the need to research specific details. Do research more while writing.

Almost all my students felt that they need to type one full page. This is a wrong idea. If the company you are applying to gets 100 applicants, then the people who look through the applications will need to read 100 letters. Make their life easier. Write only 3 paragraphs:
  • paragraph 1: introduce yourself and the job you are applying.
  • paragraph 2: explain why you are the best fit for the job. (Not just a good fit, but the best fit.)
  • paragraph 3: thank the person and close the letter.

Spend at most 30 minutes to type your cover letter draft. You can take a brief break from writing if necessary, then move on to your resume.

Resume

A resume must have 3 critical sections: Work Experience, Skills, and Education. Spend most of your time on these sections. Your contact info at the heading should take you 5 minutes max.

Spend 15 minutes researching resumes, then start typing the skeleton of your resume. At this point, you should have (1) your contact info at head of the resume and (2) section headings.

What do you write in these 3 critical sections?

Work Experience
  • List your past jobs. Include only jobs that are related to what you are applying and jobs that show significant responsibilities.
  • For each job, describe what you did. Start each description with a verb in the past tense. Examples:
    • Solved customer problems...
    • Researched and developed look and feel...
    • Fixed geometry problems...
  • Include only relevant descriptions and descriptions that show your ability to take responsibility. Keeping the list short is better (remember to make the recruiter's life easier).
Skills
  • List the software that you use.
  • For each software, describe (1) what you use it for and (2) at what level of proficiency (beginner, intermediate, or expert user).
    • Examples:
      • 3ds Max: Expert user (level of proficiency) for 3D modelling and texturing (usage).
      • Nuke: Expert user for 2D compositing.
      • ZBrush: Intermediate user for digital sculpting, texturing, and detailing.
    • What is the difference between intermediate and expert? My rule of thumb is this. Imagine you are in your first day of the new job. The company gives you the software and a task to do. Can you immediately launch yourself into 100% productivity, hitting shortcut keys as fast as other veterans in the company?
      • If you can, then you are an expert user.
      • If you need some time to grope around the User Interface (UI) or to remember which commands to use, then you are an intermediate user.
  • Include only relevant software. If the position requires proficiency in word processing, then do include word processing (assuming you do have the skill). Otherwise, keeping the list short is better (remember to make the recruiter's life easier).
Education
  • List the highest qualification you have, which school you got it from, and when you got it.
  • If you have multiple equivalent qualifications (usually diplomas in different aspects of arts), then list these.
If you are focused, you should finish a draft in one and a half hours.

Polishing the Drafts

You may feel that this is too easy. You are right. What you have at this point are drafts. You need to polish them now.

First, research more about the particular job you are applying. Make sure you know clearly (1) what requirements are and (2) what you will do if you get the job. Next, research about the company you are applying to. Get familiar with what they worked on.What you want to do is to eliminate as many blind spots that you have as possible. This will help you in polishing your drafts.

A student who was preparing for a modeling internship position for Lucasfilm Singapore wondered why the company needed 3D modelers since he thought the company did not do modeling that much. I answered by showing him these videos:
I finished off by mentioning "Pacific Rim" (so many giant robots, kaijus, and buildings; not mentioning different extent of damage for each model).
Just by reminding him about past films ILM worked on eliminated his blind spot that ILM (and therefore Lucasfilm) does not create model much. In addition, he realized the scope of modeling needed, both in complexity and volume, giving him a clearer idea of what he would be doing if he got the job.

How do you polish your cover letter draft?

You can mimic the process I follow for all my students. I read through what they wrote, pretending that I were a recruiter who has to read tens of cover letters.

By now, you should know more about the job and the company compared to when you started writing your draft. Identify anything that tells the recruiter that you are not clear about the job or the company. Rephrase or delete such sentences or paragraphs. If your draft as a whole draft gives off such impression, then you may want to rewrite your draft.

Next, strengthen your argument that you are the best fit for the job. You can cite past experience or explain how your background makes you that best fit.

Finally, work on the language. Here are a number of common mistakes I saw so far:
  • Bombastic words. Tune down such words because they make you sound as if you are sucking up.
  • Certain points are repeated. Eliminate repetitions.
  • Some paragraphs essentially say nothing. Delete such paragraph.
  • Some paragraph elaborate a point mentioned in another paragraph. Combine those paragraphs.
Edit ruthlessly until you have 3 short paragraphs.

Now you are ready to show your draft to people you trust who can help you to improve the grammar, word choice, et cetera. You can ask your parents, your instructor, or even cross-check with your classmate (you check your classmate's and your classmate check yours). I recommend getting feedback from a person who is meticulous about language. This can be a never ending process, so be reasonable.

How do you polish your resume draft?

Same process as polishing cover letter draft. Read your resume as if you were a recruiter who has to read tens of resumes. Again, the first thing you must do is eliminate anything that tells the recruiter that you are not clear about the job you are applying.

After that, the edits are relatively minor:
  • Make sure the recruiter can find the 3 critical sections in one glance. Adjust font size and spacing to make the 3 headings easy to find.
  • Any past jobs or past responsibilities that will not interest the recruiter must be removed.
  • On the other hand, if researching about the job and the company remind you of a past experience you forgot to write, then do add this.
Edit and format ruthlessly until you fit your resume within 2 pages.

Now you are ready to show your resume draft around and get feedback.

(One point to note here. I am in Singapore where the words "resume" and "CV" mean the same thing. If you are not in Singapore, please make sure you write what the company asks for.)


I hope this post convinces you that writing a cover letter and a resume in half a day is possible. I am sure you give yourself more time than half a day, so you can definitely finish yours with reasonable quality. In the next post, I will cover the demo reel (and possibly a portfolio).

If you have a different take, please leave a comment below. I would especially like to hear what recruiters want :)

(Edited on 2 May 2015. Added elaboration on levels of proficiency and closing line.)
(Edited on 15 May 2015. Pointed out the I assumed the context of 3D computer graphics industry.)

Friday, February 27, 2015

Scripting Particle Flow - Making Particles Cast Light


Creating glowing particles is easy. However, the particles should cast light to the scene, as the video above shows. Creating the light pass is not so easy. This post will suggest two methods to create such light pass using 3ds Max.

Method 1: Using Final Gather

You may already be jumping on your seat, screaming "Use FG!" to your screen. Final Gather (FG) is a method to compute indirect, or bounced, lighting. In the case of our glowing particles, the glowing material will cast indirect light to the scene (only lights cast direct lighting in CG renders). This method resulted in the video below.


This method kind of works. However, it has these weaknesses:
  • The resulting light pass flickers. On the video above, this is especially clear on the ceiling.
  • The color of light cast is difficult to control. FG tends to produce pale (desaturated) colors.
  • Render time is rather long. The light pass for the video above took around 3 hours to render.
With all these weaknesses, we should be thinking of a better way to render the light pass.

Method 2: Scripting Particle Flow

This method uses direct lighting and therefore avoid all weaknesses associated with Final Gather. The question is how do we move lights according to particle movement?

We can do so using an operator for Particle Flow called Script Operator. Here is my Particle View setup:
To add our custom script, select the Script Operator and click the "Edit Script" button. A new dialog will appear. Replace the script with the following:
on ChannelsUsed pCont do
(
     pCont.usePosition = true
)

on Init pCont do
(
    -- Keep the lights in an array.
    global LightArray = $ParticleLight* as array

    -- Default position for the lights.
    global defaultPos = getNodeByName("Help_LightDefaultPos")
)

on Proceed pCont do
(
    t = pCont.getTimeStart() as float
    if t >= 0 then
    (
        -- Move particle lights.
        pcount = pCont.NumParticles()
        for i in 1 to pcount do
        (
            pCont.particleIndex = i
            if i <= LightArray.count then
            (
                LightArray[i].position = pCont.particlePosition
            )
        )

        -- Move extra lights to default position.
        if LightArray.count > pcount then
        (
            for i in pcount+1 to LightArray.count do
            (
                LightArray[i].position = defaultPos.position
            )
        )
    )
)

on Release pCont do
(

)
This script assumes the following:
  • There are lights in the scene.
    • That is, the script does not create the lights.
    • You can create a lot of light using 3ds Max Array tool ("Tools" menu > "Array...").
  • The lights are named "ParticleLight*". For example, there should be "ParticleLight001", "ParticleLight002", and so on.
  • There is an object named "Help_LightDefaultPos" somewhere in the scene. A light will be aligned to this object if the light is not yet needed.
Here is what the script does. It starts by collecting all the lights into an array called "LightArray". Then, on each frame, it will move a light to each particle. If there are more lights than particles, the unused lights are aligned to the object called "Help_LightDefaultPos".

This method resulted in the video at the top of this post. You can download my Max file and study it.

Further Reading

This post only touches the smallest tip of particle scripting. To learn particle scripting further, have a look at Bobo's tutorials on Particle Flow scripting.

Thursday, January 1, 2015

Reflection on Batman Tumbler - Part 3: Checking Angles

This is the final part of a material walkthrough for Batman Tumbler model. I explained the problem in Part 1 as well as offered a partial solution. Part 2 followed up with map manipulations to improve the render.

At the end of Part 2, I got this render.
Figure 1. Render at the end of Part 2.

It looks pretty good: the metal parts have reflection and dirt details at the front part can be seen. Now it is time to check renders of other frames.

The roundtable animation has 120 frames. At this stage, I do not want to render every frame yet. Instead, I rendered every 30 frame to get four different angles of the Tumbler.
Figure 2. The rendered four angles

Looking at the 2 back angles, I found the back wheels looked too "painted" due to the Diffuse map. To reduce the painted feel, I composited Noise maps on top of the Diffuse bitmap. As figure 3 shows, I used 2 Noise maps to break the regular look of the Noise maps.
Figure 3. Composite map to reduce the painted feel of wheel diffuse

For consistency, I made the same modification to the front wheel Diffuse map. Here are the final renders. (On hindsight, the front wheels look too new in these renders.)
Figure 4. Four angles of the final render
I turned on Final Gather to make the shadow areas brighter when rendering the final video. I made further minor parameter tweaks that made the final video look slightly different from the renders above.
Here are two points about Arch & Design that I learned from this test:
  • Setting Reflection Glossiness very low will result in dark or even black reflections.
  • Reflection Color should be close to white.
I hope you find this walkthrough useful.

Credit: The Tumbler model and textures were created by Henry Chan. 

Wednesday, December 10, 2014

Reflection on Batman Tumbler - Part 2: Reflection Color

In the previous post, we saw how I got back reflections and hit another problem with bump effect as shown here.
Figure 1. The last render we covered. Notice the bump effect problem on the metal piece near the back wheel.
There is a metal piece near the back wheel that should be smooth but looks bumpy. I checked the Bump map slots and found that the Bump map slot was assigned an incorrect bitmap. Easy to fix. Other than that, I felt the bump was too strong, so I reduced the bump amount from the default 0.3 to 0.15. I got this render.
Figure 2. Bump effect fix. Note that the metal piece near the back wheel now looks smooth.
At this point, the render looked fine and I could have stopped. However, I thought I should make use of the painted texture maps in some way. To begin, I assigned the Specular bitmap to the Reflection Color map slot.
Figure 3. The Specular bitmap
I know that reflection color for an Arch & Design material should be close to white. How do I make the Specular bitmap, which is rather black, close to white? I needed to cheat and I cheated in 2 steps.
First, I forced the image to be interpreted as if it had gamma value of 1.0 even though it actually had sRGB gamma (which is approximately gamma 2.2).
Figure 4. Forcing gamma 1.0 interpretation
Next, I manipulated the Output Curve of the bitmap to make it even closer to white.
Figure 5. Manipulating bitmap Output Curve
Here is a comparison to show what these steps do.
Figure 6. Specular bitmap comparison. 1: original image; 2: forcing gamma 1.0 interpretation; 3: manipulating Output Curve

With these manipulations, I got this render.
Figure 7. Render with manipulated Specular bitmap
Note that I got back the dirt details painted in the Specular bitmap. However, I found the reflection color of the dirt too dark. I know that the Diffuse bitmap has color for dirt areas, so I made another cheat: I added the Diffuse map, interpreted as having gamma 1.0, to the Specular bitmap. I used a Composite map to do this. Here is my setup.
Figure 8. Adding Diffuse bitmap to Specular bitmap
And here is the render that I got.

Figure 9. Render with Diffuse map added to reflection color

Now it is time to check the render from other angles.We will cover this in the next post.

Credit: The Tumbler model and textures were created by Henry Chan.

Friday, December 5, 2014

Reflection on Batman Tumbler - Part 1: Getting Back Reflection

Last week I did a quick Arch & Design shader test for my class. Here is the result:


First, a proper credit. The Tumbler model and textures were created by Henry Chan, a modeling student here at CG Protege.

The reason I carried out the test out was that Julien Lew, a student in the Visual Effects class I am teaching, used the model in his assignment. He worked on the shaders and could not get reflections on the model. In this post, I will share what I found.

Technical details are due. All the images were rendered using 3ds Max 2011, Mental Ray renderer. The shaders are Arch & Design.

I started off with this render.
Figure 1. Starting render. Note the lack of reflection on the body.
I used Mental Ray Daylight system and turned on the mr Photographic Exposure Control. I set Exposure Value (EV) to 10.0. To save effort of selecting a HDR map, I simply used mr Physical Sky map. I used a Photometric light for rim lighting and 8 photometric lights surrounding the Tumbler as fill lights. This way, I can get reasonably good-looking render without using Final Gather. Figure 2 shows my lighting setup.
Figure 2. Lighting setup
The first step in troubleshooting a complex shader is to understand its structure. Next, go through the structure to isolate the cause of the problem. Thanks to Julien's work, we isolated the cause of lack of reflections to the material called "Grey" assigned to the Tumbler body.
Figure 3. "Grey" material

The Reflection Glossiness map slot (highlighted in figure 3) caught my eye. Inspecting the bitmap used as glossiness map, I found that it was very dark.
Figure 4. Bitmap used as glossiness map
To verify, I rendered with the glossiness map disabled (in other words, Reflection Glossiness was constant at 0.5 throughout the surface).
Figure 5. Render with constant glossiness. Note the unnatural bumps on the metal piece near the back wheel.

Now I got reflections on the metal body. Problem solved.

However, another problem arose. One of the metal pieces near the back wheel had strange bumps (I expected it to be smooth). The next post will cover this.

Credit: The Tumbler model and textures were created by Henry Chan.