Showing posts with label Lighting. Show all posts

Friday, May 22, 2015

Setting Up HDR Lighting using 3ds Max and Mental Ray

One question I am often asked by students is how to set up nice lighting for a model. In most cases, the model is a character or a prop. (Environment models require a different way of lighting.) In this post, I will walk through the process of lighting a model. I am using 3ds Max with Mental Ray renderer in this tutorial.

To illustrate, I will use this head model.
Figure 1. Plain model
I start by using a HDR image as the environment map.
A few words about HDR. HDR stands for "high dynamic range". Dynamic range means the possible range of brightness that an image has.
  • Images that we are familiar with, such as JPG files, are said to have a standard or low dynamic range because they are limited to the range of black (brightness value 0.0) to white (brightness value 1.0).
  • High dynamic range images (HDR images) have a range beyond 0.0 and 1.0. The brightest pixel, such as lights or the sun, can have a value like 120.48. Much larger than 1.0!
Practically, this means that a HDR image has a different format and is usually larger in size. Typical formats are .HDR and .EXR. For the case of the HDR image I will use below, it has the dimension of 4000x2000 and file size of 22.9 MB. The low dynamic range version, a JPG file, with the same dimension has a file size of 3.8 MB.
I recommend reading the Wikipedia article on HDR to learn more.

I used the "Luxo Jr" HDRI map provided by Pixar (who kindly put it in public domain). Figure 2 shows how to create a Bitmap map that uses a HDR image file:
  1. Create a Bitmap map using Material Editor. (Press "M" to open the Material Editor.)
  2. Make sure to override the image gamma to 1.0.
  3. Click "Setup" button.
  4. Make sure "Enable Color Correction" is disabled.
  5. Set Mapping to "Spherical Environment".
  6. Set U Tiling to -1.0 to flip the image horizontally.
Figure 2. Preparing a Bitmap map to be used as the environment map
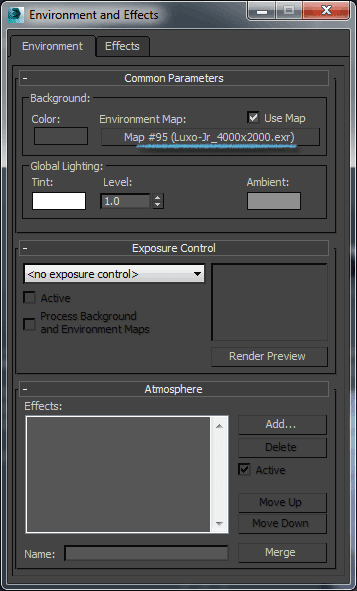
I then dragged and dropped "HDR map" into Environment Map slot. (Press "8" to open the Environment and Effects dialog.)
Figure 3. Setting the Bitmap to the Environment Map slot
 At this point, I get this render. As expected, the background is now an image.
Figure 4. Rendered image after setting the Environment Map

In case your render is much darker, make sure you enable gamma correction.
Figure 5. Enabling Gamma Correction

Next, I created a Daylight system.
Figure 6. Creating a Daylight system

Using a Daylight system means that we need to turn on Exposure Control in Environment and Effects
dialog. I will cover this below. Here are the settings for the Daylight system:
  1. Set Position to "Manual", then move the Daylight to the appropriate position. I used the background image to guide the placement.
  2. Set Sunlight to "mr Sun" and Skylight to "mr Sky". ("mr" stands for Mental Ray; though I find myself reading them as "mister Sun" and "mister Sky".)
  3. Set Red/Blue Tint of mr Sun to 0.1.
    • This makes the sun color a little yellow.
Figure 7. Daylight system and its settings

And here are the settings for Exposure Control in Environment and Effects dialog.
  1. Drag and drop "HDR map" from Material Editor to Environment Map slot.
  2. Set Exposure Control to "mr Photographic Exposure Control".
  3. Set Exposure Value (EV) to 14.125.
    • This will make rendered image not overly bright.
    • If I set the Exposure Value to 0, the rendered image will by almost totally white because the strong mr Sun overexposes the image.
Figure 8. Setting Exposure Control

Some of the settings above are my attempt to match the lighting in the background image. Matching lighting in this case involves 3 steps:
  • Placing the Daylight approximately where the sun is in the background image;
  • Setting the Exposure Value such that the brightness of the Daylight is similar to the background image;
  • Setting the Red/Blue Tint parameter of mr Sun to match how yellow the sunlight is in the background image.

Finally, I turned on Final Gather (FG).
  1. Check Enable Final Gather.
  2. Set the three parameters (Initial FG Point Density, Rays per FG Point, and Interpolate Over Num. FG Points) as shown below.
Figure 9. Enabling Final Gather
 After all these setups, we are done with our lighting setup. Here is my final render.
Figure 10. Rendered image with the HDR lighting

Bonus: Image-Based Lighting (IBL)

An alternative method is Image-Based Lighting (IBL). IBL is faster to set up (you do not need to match the lighting in the background image), but slower to render.

The first two steps are identical to the previous method:
  1. Create a Bitmap map that uses a HDR image.
  2. Drag and drop the Bitmap map to the Environment Map slot in "Environment and Effects" dialog.
Next, we create a Skylight. Make sure to select "Use Scene Environment".
Figure 11. Creating a Skylight
 We then enable IBL in the "Global Illumination" tab.
Figure 12. Enabling Image-Based Lighting (IBL)
Here is the render that I get.
Figure 13. Rendered image using IBL

Thursday, March 26, 2015

Different Ways to Light a Bedroom

Ending this series on lighting is interior lighting. Compared to a character and an exterior set, I found interior set the most difficult to light. Here is why.

Interiors are enclosed space usually lit naturally by sunlight. This means the only light sources are openings such as the windows on the images above. The big question is how do we bounce light from the windows to all other parts of the room? (This bounce light question can be answered easily in the two other cases. For characters, we simply add more fill lights. For exterior set, the need for bounce light is minimized by lighting from the sky.) There are two answers that I know of.

The first is using Final Gather to bounce the light. This is, after all, what Final Gather was designed to achieve. The first image was rendered using this method.
The main disadvantage of this method is render time. The Final Gathering step took 2+ hours (I needed 3 diffuse bounces to reach the floor area under the bed); the rendering time took 5 hours. The reason for 5-hour render time is noise elimination. This method uses no fill light at all, requiring high sampling quality to eliminate shadow noise.
Another disadvantage is artistic control. Controlling image contrast with lighting alone is impossible; post-render color correction is needed.

The other alternative is using an ambient light. You can read about this method as explained by Zap Anderson on his blog. The ambient light is an omni light with Ambient Occlusion projection map.
This method renders much faster. The ambient light helps to (1) eliminate the need for Final Gather diffuse bounce (I used Final Gather with 0 diffuse bounce) as well as (2) minimize the visibility of shadow noise from the key lights (the window lights).
Finally, this method allows more artistic control. By setting different intensity for key light and ambient light, I could control image contrast even at rendering stage.

Friday, March 20, 2015

Different Ways to Light a Town Center

After character lighting, I continued with exterior set lighting. Getting a basic lighting for a set is not difficult. The difficulties mainly come from working with a large file and fixing mistakes in the model; not from lighting itself.

Creating a good-looking mood lighting, though, takes more effort. The first difficulty is designing interesting lighting schemes. I researched for ideas at Pinterest. There are many boards there to get lighting schemes from, such as 2D3D_env board and Digital Environments board.

Next step is implementing the lighting schemes I picked, which are 2D paintings, in a 3D scene. Using 3ds Max Daylight System with mental ray Sun & mental ray Sky helps a lot. I spent most of my time placing the Sun. After that, I only needed to make minor adjustments. One interesting step is perhaps about getting cloud shadow. I experimented placing a floating box near the Sun and was pleasantly surprised that mental ray Sun creates a soft shadow as expected. I used this trick for the "Morning" image. If you know another trick, please share it in the comments.

I did color corrections in Photoshop. Color Balance adjustment layers are effective to get colors close to those in the lighting schemes. I also cheated lighting quite a bit. For example, in the "Morning" image, I used an extra rim lighting on the foreground tree to get more details. In the "Sunrise" image, I brightened the bright line along the road, which made the lit wall on the left extremely bright. I hand-painted a layer mask so that only the road was brightened.

As always, feel free to tell me what you think in the comments.

Thursday, March 12, 2015

Different Ways to Light a Character


Different ways to light Bruce Willis
Recently I have been practicing lighting, specifically character lighting. First big question: How many ways should I light the character?

After a little research, I decided to cover 7 ways that I thought were large enough a variety. In addition, 7 cases should be enough opportunity to develop an understanding of what is important in lighting.

The more I researched for reference, though, the more interesting lighting schemes I came across. This gave me the one extra case to make a total of 8 schemes above.

Next big questions:
  • Should I vary the camera angle to maximize impact?
  • Should I employ compositing, again, to maximize impact?
Well, I am hoping to use these as material for a short course on lighting. The course goal is to give students chance to experience lighting as much as possible. This means the class is simply lighting, lighting, and lighting.

With this in mind, I decided to keep one camera angle so that comparisons between lighting schemes will be more objective. I also decided to forego compositing to keep the focus on lighting.

This does not mean that I am not planning to polish these :)